When needing to fetch data for a project-based private app, whether for a UI extension or CMS React project, you’ll use a serverless function. When executed, HubSpot runs the serverless function server-side using JavaScript. Because HubSpot runs the function, you don’t need to manage your own server. Your access to using serverless functions depends on your HubSpot subscription:Documentation Index
Fetch the complete documentation index at: https://developers.hubspot.com/docs/llms.txt
Use this file to discover all available pages before exploring further.
- UI extensions: using serverless functions for UI extensions requires an Enterprise subscription. You can also test out UI extensions for private apps for free in a developer test account.
- CMS: using serverless functions for CMS React projects requires a Content Hub Enterprise subscription.
src/app directory within a <AnyName>.functions folder. At the most basic level, this folder should include:
- One or more JavaScript files that export a
mainfunction. - A
serverless.jsonfile that registers and configures your functions. Learn more about serverless function configuration.
Create a serverless function
Serverless functions for private apps in projects can be executed in two ways:- App function: a serverless function that gets executed directly from within the project using the
hubspot.serverlessAPI. - Endpoint function (Content Hub Enterprise only): an app function that is invoked by calling a public URL. The URL is determined by the account’s connected domains and the path specified in the
serverless.jsonfile. This is more common for implementing serverless functions for the CMS.
Configuration
In the serverless functions directory, configure the serverless function with aserverless.json file. In this file, you’ll configure your serverless function name and the path of the JavaScript file to execute, along with any secrets that might need to be included for authentication.
If you have a Content Hub Enterprise subscription, you can configure a serverless function to be invoked by a public URL by including an endpoint object in the config. Learn more about endpoint functions.
| Parameter | Type | Description |
|---|---|---|
file | String | The .js file in the project to execute. |
secrets | Array | To authenticate requests, you can include secrets as string values in this array. Learn more about managing secrets. |
endpoint | Object | If invoking the function by a public URL (Content Hub Enterprise only), this object defines the endpoint details:
|
Building the function
Each serverless function exports amain function that gets called when HubSpot executes it. The function receives the context argument, which is an object that contains data based on how the function is being used. This includes context about where the card is loaded as well as the authenticated user and account. Learn more about what’s included in the context object.
Below is an example of a function that returns a 200 status code and a Hello World message.
- function.js
- Extension.jsx
- Logged output
package.json file within app.functions.
You can find more examples of serverless functions in the following GitHub repositories:
Calling the function
In your extension’s front-end React code, you’ll call the function using thehubspot.serverless() API.
hubspot.serverless() expects a string of the name of the function to call (as defined in the serverless.json file), and an object containing the propertiesToSend and parameters fields.
- Extension.jsx
- serverless.json
| Parameter | Type | Description |
|---|---|---|
propertiesToSend | Array | An array of properties to send the serverless function from the front-end. Property values are pulled from the currently displaying CRM record. This enables retrieving property values on the server-side when the function is called. |
parameters | Object | Additional key-value pairs to supply to the function. |
hubspot.serverless() will return Promise<any>. On failure, it will reject the promise.
Endpoint functions
If you have a Content Hub Enterprise subscription, you can configure a serverless function to be invoked by a public URL. When calling the URL of a HubSpot-hosted serverless function, you can use any domain connected to your account with the following URL structure:https://<domain>/hs/serverless/<endpoint-path-from-config>.
For example, if both website.com and subdomain.brand.com are connected to the account, you could call the function using https://website.com/hs/serverless/path/to/endpoint or https://subdomain.brand.com/hs/serverless/path/to/endpoint.
In the URL to call the function, the endpoint path is global rather than scoped to the app or project. If you have identical endpoint paths across multiple apps or projects, the most recently deployed endpoint function will take precedence.
Authenticate requests
Every private app comes with an access token that you can use to authenticate calls to HubSpot’s APIs. Alternatively, you can authenticate calls using secrets, which you’ll manage through the CLI.Private app access tokens
To authenticate HubSpot API requests with private app access tokens, you’ll access the token withprocess.env['PRIVATE_APP_ACCESS_TOKEN']. For example, to make a request using HubSpot’s Node.js library:
- Ensure the @hubspot/api-client library is included as a dependency in your project.
- In the serverless function JavaScript file, include
@hubspot/api-client. - Instantiate the client within
exports.mainand includePRIVATE_APP_ACCESS_TOKENfor authentication:
- Configure the rest of the function using Node.js. For example, the following code would create a serverless function that retrieves the current contact by ID using the contacts API:
- If you’re running HubSpot CLI version 7.0.0 or above, private app access tokens are automatically available for authentication as long as your personal access key has the
developer.app_functions.writeanddeveloper.app_functions.readscopes. - If you’re running HubSpot CLI version 6.x or below, you’ll need to add the token to a
.envfile within the.functionsdirectory, as shown below. You can find the private app access token in the app’s settings in HubSpot.
Secrets
To authenticate a serverless function requests using a secret:- Create a secret by running
hs secrets add <secret-name>. HubSpot will securely store this secret on its backend and inject them into the runtime environment when a function is invoked in production. - In the
serverless.jsonfile, include asecretsfield within the corresponding function object, then specify the name of the secret. Do not includePRIVATE_APP_ACCESS_TOKENin this array, as this is automatically created for you and already available in the serverless function.
- To make secrets available for local development, create a
.envfile in the.functionsdirectory. HubSpot will never retrieve your secrets outside of its protected infrastructure, so you’ll need to specify the secret values that you want to use when the function is executed locally.
- After saving secrets to the
.envfile, you can access them in your function usingprocess.env['secretName'].
Managing secrets
HubSpot provides a set of CLI commands for create and managing secrets:- Create a secret by running
hs secrets add <secret name>. HubSpot will securely store this secret on its backend and inject them into the runtime environment when a function is invoked in production. - Update a secret by running the
hs secrets updatecommand. If you’re using a Node runtime of 14 or higher, updated secret values will automatically be updated in your deployed function within one minute, meaning you won’t have to build and deploy to get the updated secret. - View existing secrets stored in your account by running
hs secrets list. - Delete a secret by running
hs secrets delete <secret-name>. The command line will prompt you to confirm the deletion, which you can bypass by including the--forceflag.
Best practices
Keep the following recommendations in mind while you develop and test your serverless function:Variable assignment inside functions
To ensure that variables are correctly assigned and initialized with every function invocation, you should opt to assign variables within the function itself. This practice prevents potential issues related to stale or persistent variable states, which can lead to unexpected behaviors. See the example below for additional context:Stay up to date with the latest platform version
Thehsprojects.json configuration file includes a platformVersion field which specifies which platform version to run the project on. It’s strongly encouraged to use the latest platform version to ensure that your project and its assets are up to date with the latest improvements, optimizations, and feature enhancements. In addition, some previously available features may not be available in older versions due to deprecation.
The platform version also dictates which version of Node the project runs on. The latest version, 2023.2, uses Node18, and doesn’t support older versions of Node.
Including dependencies
By default, HubSpot provides a small number of NPM dependencies in addition to the Node.js standard library. To add your own dependencies, you can list the package independencies within the package.json file. When the app is built, dependencies will be bundled with your function code. All dependencies must be published to NPM and be public.
For example, if you wanted to add the lodash library in a serverless function, you would first update package.json to include the dependency:
Debug a serverless function
Log messages are produced every time HubSpot executes a serverless function. Below, learn how to access logs in HubSpot and locally using the CLI.In-app debugging
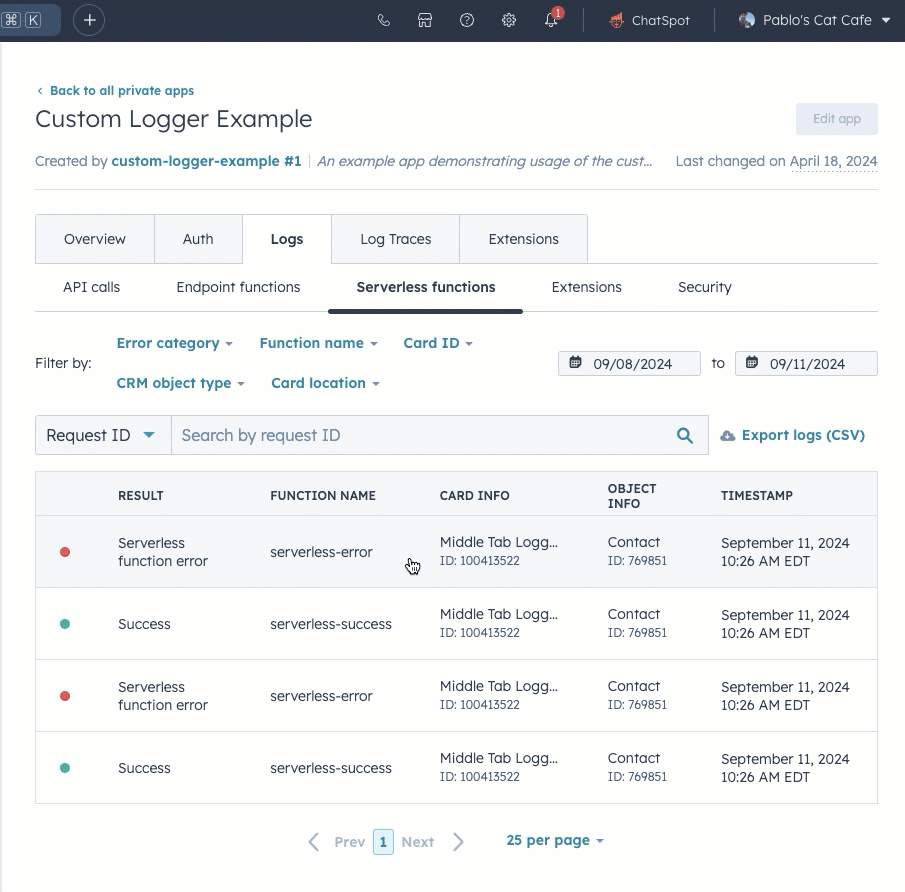
In HubSpot, you can view a serverless function’s log history for both app functions and endpoint functions, including successful requests and errors. To access a serverless function’s logs in HubSpot:- In your HubSpot account, navigate to CRM Development.
- In the left sidebar menu, navigate to Private apps.
- Select the private app that contains the serverless function.
- Click the Logs tab.
- To view logs for a serverless app function, click the Serverless functions tab. To view logs for a serverless endpoint function, click the Endpoint functions tab.
- In each tab, you can view logs for specific requests by clicking the request. You can also use the search bar to search by request ID.
- In the right panel, you can then click View log trace for a more in-depth breakdown of the request.
 You can also include
 console.log() in your serverless function code for debugging purposes, then view its output in the function log details sidebar.
Local debugging
Log messages are produced every time HubSpot executes a serverless function. To view a serverless function’s logs in the CLI, run thehs project logs command. Learn more about using the hs project logs command.
There are two types of log messages produced:
- Log messages that record the execution of a function, along with its status and timing. For example:
2021-04-28T19:19:21.666Z - SUCCESS - Execution Time: 279ms - Log messages that are produced through console statements in the function code. For example, your serverless function JavaScript might include:
2021-04-28T19:15:13.200Z INFO Log some debug info
2021-04-28T19:15:14.200Z ERROR An error occurred