> ## Documentation Index
> Fetch the complete documentation index at: https://developers.hubspot.com/docs/llms.txt
> Use this file to discover all available pages before exploring further.

---
id: f2ea6ae6-47ef-4bc0-944e-c8433d73149e
---

# Create custom quote modules

> Learn how to build, configure, and deploy custom coded modules for quotes.

export const SupportedProducts = ({marketing, sales, service, cms, data, commerce, crm, marketingLevel, salesLevel, serviceLevel, cmsLevel, dataLevel, commerceLevel, crmLevel}) => {
  const translations = {
    description: "Requires one of the following products or higher.",
    productNames: {
      marketing: "Marketing Hub",
      sales: "Sales Hub",
      service: "Service Hub",
      cms: "Content Hub",
      data: "Data Hub",
      commerce: "Revenue Hub",
      crm: "Smart CRM"
    },
    tiers: {
      free: "Free",
      starter: "Starter",
      professional: "Professional",
      enterprise: "Enterprise"
    }
  };
  const translateTier = tier => {
    if (!tier) return '';
    const lowerTier = tier.toLowerCase();
    return translations.tiers[lowerTier] || tier;
  };
  const products = [{
    name: marketing ? translations.productNames.marketing : '',
    level: translateTier(marketingLevel),
    icon: "https://www.hubspot.com/hubfs/Knowledge_Base_2023-24-25/developer/icons/MarketingHub.svg",
    alt: "Marketing Hub"
  }, {
    name: sales ? translations.productNames.sales : '',
    level: translateTier(salesLevel),
    icon: "https://www.hubspot.com/hubfs/Knowledge_Base_2023-24-25/developer/icons/SalesHub.svg",
    alt: "Sales Hub"
  }, {
    name: service ? translations.productNames.service : '',
    level: translateTier(serviceLevel),
    icon: "https://www.hubspot.com/hubfs/Knowledge_Base_2023-24-25/developer/icons/ServiceHub.svg",
    alt: "Service Hub"
  }, {
    name: cms ? translations.productNames.cms : '',
    level: translateTier(cmsLevel),
    icon: "https://www.hubspot.com/hubfs/Knowledge_Base_2023-24-25/developer/icons/ContentHub.svg",
    alt: "Content Hub"
  }, {
    name: data ? translations.productNames.data : '',
    level: translateTier(dataLevel),
    icon: "https://www.hubspot.com/hubfs/Knowledge_Base_2023-24-25/developer/icons/DataHub.svg",
    alt: "Data Hub"
  }, {
    name: commerce ? translations.productNames.commerce : '',
    level: translateTier(commerceLevel),
    icon: "https://www.hubspot.com/hubfs/Knowledge_Base/subscription_key_icons/commerce_icon.svg",
    alt: "Revenue Hub"
  }, {
    name: crm ? translations.productNames.crm : '',
    level: translateTier(crmLevel),
    icon: "https://www.hubspot.com/hubfs/Knowledge_Base_2023-24-25/developer/icons/SmartCRM.svg",
    alt: "Smart CRM"
  }].filter(product => product.name && product.level);
  if (products.length === 0) return null;
  return <div>
      <div className="text-sm mb-2">{translations.description}</div>
      <div className={`grid ${products.length === 1 ? 'grid-cols-1' : 'grid-cols-2'} gap-1.5`}>
        {products.map((product, index) => <div key={index} style={{
    display: 'flex',
    alignItems: 'center'
  }}>
            <img src={product.icon} alt={product.alt} className="w-3.5 h-3.5 mr-1.5 mt-2.5 mb-2.5 flex-shrink-0 align-middle" />
            <span className="font-medium mr-1 text-sm">{product.name} -</span>
            <span className="text-sm">{product.level}</span>
          </div>)}
      </div>
    </div>;
};

<Accordion title="Supported products" defaultOpen="true" icon="cubes">
  <SupportedProducts commerce={true} commerceLevel="Professional" />
</Accordion>

This guide walks through building and deploying a custom module for quotes using HubSpot's [quote-dev-starter](https://github.com/HubSpot/quote-dev-starter) project. You'll download the project, learn how the example quote module works, then upload it to your account to use in quotes.

You can learn more about use cases, accessing data, and limitations in the [overview](/docs/cms/start-building/building-blocks/modules/quotes/overview).

<Warning>
  **Please note:** at this time, creating projects with quote modules isn't supported through existing HubSpot CLI commands. Instead, use the [example project](#download-the-example-project) to get started.
</Warning>

## Prerequisites

* The [HubSpot CLI](/docs/developer-tooling/local-development/hubspot-cli/install-the-cli) installed and authenticated.
* A ***Revenue Hub*** *Professional* or *Enterprise* account.
* Familiarity with React and [CMS React modules](/docs/cms/start-building/introduction/react-plus-hubl/overview).

## Download the example project

To get started, download HubSpot's [quote-dev-starter](https://github.com/HubSpot/quote-dev-starter) project from GitHub. It contains a working example of a typed React module that pulls quote and CRM data from HubL and hydrates an interactive island on the client.

This will also run a `postinstall` step to install dependencies in `src/cms-assets/my-react-assets/`.

```shell theme={null}
npm install
```

Below is a high-level overview of the key project files:

<Card>
  <Tree>
    <Tree.Folder name="src/cms-assets/my-react-assets" defaultOpen>
      <Tree.File name="Globals.d.ts" />

      <Tree.Folder name="components/modules/QuoteExampleModule" defaultOpen>
        <Tree.File name="index.tsx" />

        <Tree.Folder name="islands" defaultOpen>
          <Tree.File name="InteractiveButton.tsx" />
        </Tree.Folder>
      </Tree.Folder>
    </Tree.Folder>
  </Tree>
</Card>

* `index.tsx`: the module entry point. Exports the React `Component`, `fields`, `meta`, and `hublDataTemplate`. This is where you define what data the module receives and how it renders.
* `islands/InteractiveButton.tsx`: a client-hydrated [Island](/docs/cms/reference/react/islands) component that adds interactivity to the published quote.
* `Globals.d.ts`: type declarations for the project. The [`@hubspot/quote-dev-sdk`](https://www.npmjs.com/package/@hubspot/quote-dev-sdk) package provides the `QuoteTemplateContext` type used in the module, which gives you compile-time safety against the `quoteTemplateContext` shape available in HubL.

## Review the example module

### Module configuration

The module's `meta` export sets its label and the [content types](/docs/cms/reference/modules/configuration) it supports. Both `QUOTE` and `QUOTE_BLUEPRINT` are required.

```tsx index.tsx theme={null}
export const meta = {
  label: 'Example Module',
  content_types: ['QUOTE', 'QUOTE_BLUEPRINT'],
};
```

Fields are defined using JSX field components. The example project includes text fields for editable content and color fields in a `STYLE` tab for appearance options:

```tsx index.tsx theme={null}
export const fields = (
  <ModuleFields>
    <TextField name="heading" label="Heading" default="Hello, World!" />
    <TextField name="buttonLabel" label="Button Label" default="Click me!" />
    <FieldGroup name="styles" label="Styles" tab="STYLE">
      <ColorField name="backgroundColor" label="Background Color" />
      <ColorField name="headingColor" label="Heading Color" />
    </FieldGroup>
  </ModuleFields>
);
```

For the full list of available fields, see the [fields reference](/docs/cms/reference/fields/module-theme-fields).

### Accessing quote data

The `hublDataTemplate` export is a HubL string that runs server-side and passes data into your React component via `props.hublData`. The example uses it to extract specific values from `quoteTemplateContext` and to fetch data using the [`crm_object()` HubL function](/docs/cms/reference/hubl/functions#crm_object):

```tsx wrap index.tsx theme={null}
export const hublDataTemplate = `
  {# quoteTemplateContext.buyerCompany is already available in the quote template context, but we use
     crm_object() here as an example of querying CRM data via HubL #}
  {% if quoteTemplateContext.buyerCompany.hs_object_id %}
    {% set companyDetails = crm_object("company", quoteTemplateContext.buyerCompany.hs_object_id, "name,domain") %}
  {% endif %}

  {% set hublData = {
    "quoteTitle": quoteTemplateContext.quote.hs_title,
    "isQuoteBlueprint": isQuoteBlueprint,
    "isInEditor": is_in_editor,
    "companyName": companyDetails.name if companyDetails else null,
    "companyDomain": companyDetails.domain if companyDetails else null
  } %}
`;
```

`hublDataTemplate` demonstrates a few key patterns:

* **Targeted data:** `hublData` is built as a specific object with only the values the component needs, rather than passing the entire `quoteTemplateContext`. This keeps the quote clean by only exposing the properties needed.
* **Fetching data:** the example uses `crm_object()` to fetch specific property values (`name` and `domain`) from the associated company. You can use HubL functions such as `crm_object()` and `crm_associations()` to fetch data beyond what's available directly in `quoteTemplateContext`.
* **Conditional rendering:** within `hublData`, the `is_in_editor` flag is passed to React so that the component can adjust its rendering in the editor context. See [Adding client-side interactivity](#adding-client-side-interactivity) for more information.

<Warning>
  **Please note:** passing the full `quoteTemplateContext` or any of its sub-objects (such as `quoteTemplateContext.quote`) as island props will expose all of that object's properties in the published quote's source code. This includes standard and custom properties from the quote and all associated objects, such as the deal, line items, contacts, companies, and attachments. Learn more about [passing data props](#passing-data-props) to avoid exposing sensitive information.
</Warning>

### Providing fallback data for templates

`isQuoteBlueprint` is a HubL global variable that is `true` when the module is rendered inside a quote template rather than an individual quote. Since quote templates are not attached to a real quote, properties like company name will be empty.

The example handles this by substituting placeholder values (e.g., `HubSpot`) when `isQuoteBlueprint` is true:

```tsx wrap index.tsx theme={null}
export function Component({ fieldValues, hublData }: any) {
  const {
    quoteTitle,
    isQuoteBlueprint,
    companyDomain: rawCompanyDomain,
    companyName: rawCompanyName,
  } = hublData;
  const companyName = isQuoteBlueprint ? 'HubSpot' : rawCompanyName;
  const companyDomain = isQuoteBlueprint ? 'hubspot.com' : rawCompanyDomain;
  // ...
}
```

This ensures that template editors see a realistic-looking preview rather than blank fields.

### Adding client-side interactivity

React modules use server-side rendering. To add client-side interactivity, you can use [islands](/docs/cms/reference/react/islands), which hydrate server-rendered HTML with client-side JavaScript. The example project includes a simple button as an island (`InteractiveButton.tsx`), which is a standard React component with client-side state:

```tsx InteractiveButton.tsx theme={null}
import { useState } from 'react';

export default function InteractiveButton({
  buttonLabel,
}: {
  buttonLabel: string;
}) {
  const [count, setCount] = useState(0);

  return (
    <div>
      <p>Click count: {count}</p>
      <button onClick={() => setCount((prev) => prev + 1)}>
        {buttonLabel}
      </button>
    </div>
  );
}
```

Note that the island is imported twice in `index.tsx`: once as a plain component (for static rendering in the editor), and once with the `?island` suffix (for client-side hydration when live):

```tsx index.tsx theme={null}
// @ts-expect-error -- ?island not typed
import InteractiveButton from './islands/InteractiveButton?island';
import InteractiveButtonComponent from './islands/InteractiveButton';
```

#### Passing data props

Any props you pass to an `Island` are serialized into the page HTML so the component can hydrate on the client. This means island prop values are visible to anyone who views the source code of the published quote page. Because quote data can include sensitive information such as line item pricing, customer details, and custom CRM properties, you should pass only the specific property values your island needs to render.

For example, to make the quote title available to an island, pass the `hs_title` string:

```tsx index.tsx wrap theme={null}
// In hublDataTemplate, extract only what the island needs:
// {% set hublData = { "quoteTitle": quoteTemplateContext.quote.hs_title } %}

<Island
  module={InteractiveButton}
  hydrateOn="load"
  quoteTitle={hublData.quoteTitle}
/>
```

In contrast, passing the full `quoteTemplateContext` as shown below would expose all quote and associated object properties on the rendered page:

```tsx index.tsx wrap theme={null}
// Example of what NOT to do
<Island
  module={InteractiveButton}
  hydrateOn="load"
  quoteTemplateContext={hublData.quoteTemplateContext}
/>
```

### Conditional rendering

Because islands cause full quote preview reloads in the editor (rather than per-module hot reloads), the example island prevents rendering in the editor context using the `isInEditor` flag. Instead, it renders a static version of the button component with an explanatory note:

```tsx index.tsx theme={null}
{
  isInEditor ? (
    <>
      <InteractiveButtonComponent buttonLabel={fieldValues.buttonLabel} />
      <p style={{ fontStyle: 'italic', opacity: 0.7 }}>
        This button will not be interactive until the quote is published.
      </p>
    </>
  ) : (
    <Island
      module={InteractiveButton}
      hydrateOn="load"
      buttonLabel={fieldValues.buttonLabel}
    />
  );
}
```

The `isInEditor` flag comes from `hublData`, where it's set in `hublDataTemplate` as `is_in_editor`.

```jinja index.tsx highlight={4} theme={null}
{% set hublData = {
  "quoteTitle": quoteTemplateContext.quote.hs_title,
  "isQuoteBlueprint": isQuoteBlueprint,
  "isInEditor": is_in_editor,
  "companyName": companyDetails.name if companyDetails else null,
  "companyDomain": companyDetails.domain if companyDetails else null
} %}
```

While rendering is prevented in the editor context, the island will render in the previewer. This is helpful for speeding up development. However, you can also prevent the island from rendering in the previewer by using the [`is_in_previewer` variable](/docs/cms/reference/react/cms-components-library#useeditorvariablechecks). This is recommended for modules where the client-side interactivity writes data, as it prevents the quote author from accidentally changing something before publishing.

### Rendering for print and PDF

Quotes are web pages that users can save and share as PDFs. When generating a PDF, HubSpot renders the quote with a `?print=true` query parameter in the URL. You can check for this parameter in island components to skip interactive behavior that doesn't make sense in a static document.

For example, a navigation island that scrolls buyers to sections of the quote should be hidden when printing:

```tsx QuoteNav.tsx theme={null}
import { usePageUrl } from '@hubspot/cms-components';

export default function QuoteNav({ sections }: { sections: string[] }) {
  const url = usePageUrl();
  const isPrint = url.searchParams.get('print') === 'true';

  if (isPrint) {
    return null;
  }

  return (
    <nav>
      {sections.map((section) => (
        <a key={section} href={`#${section}`}>
          {section}
        </a>
      ))}
    </nav>
  );
}
```

To adjust styles for the printed or PDF output, use the `@media print` CSS media query. For example, to hide a navigation element that only makes sense in the browser:

```css theme={null}
@media print {
  .module-nav {
    display: none;
  }
}
```

## Control acceptance and payment state

`@hubspot/quote-dev-sdk` provides two hooks for reading and controlling the live acceptance and payment state of a quote from within a custom module:

* [`useQuoteAcceptance`](#usequoteacceptance)
* [`useQuotePayment`](#usequotepayment)

Both hooks must be used inside an [island component](/docs/cms/reference/react/islands), since they rely on client-side events.

<Note>These hooks require `@hubspot/quote-dev-sdk` v0.2.0 or later.</Note>

### `useQuoteAcceptance`

The `useQuoteAcceptance` hook returns `{ loading, error, data, control }`.

`data` contains the following:

| Field | Type | Description |
| - | - | - |
| `accepted` | Boolean | Whether the quote has been accepted. |
| `acceptanceMethod` | String | The method used to accept the quote (`'clickwrap'`, `'esignature'`, `'print_and_sign'`, or `null`). |
| `signers` | Array | The list of signers for the quote. |

`control` exposes `enable()` and `disable({ reason? })`. Note that `disable()` will have no effect when `accepted` is `true` or when `acceptanceMethod` is `'print_and_sign'`.

The starter project's [`RequiredAgreementModule`](https://github.com/HubSpot/quote-dev-starter/tree/master/src/cms-assets/my-react-assets/components/modules/RequiredAgreementModule) shows a complete working implementation. The module is split across two component files: a parent `index.tsx` that detects the editor context and wraps the interactive piece in an `Island`, and `islands/TermsAcceptance.tsx`, which contains the hook logic. The island renders a terms checkbox and calls `control.disable()` or `control.enable()` based on the buyer's input:

```tsx theme={null}
import { useEffect, useState } from 'react';
import { RichTextFieldWrapper } from '@hubspot/cms-components';
import { useQuoteAcceptance } from '@hubspot/quote-dev-sdk';
import styles from '../TermsAcceptance.module.css';

export default function TermsAcceptance({
  heading,
  termsText,
  disabledReason,
  isInEditor = false,
}: {
  heading: string;
  termsText: string;
  disabledReason: string;
  isInEditor?: boolean;
}) {
  const { loading, error, data, control } = useQuoteAcceptance();
  const [agreed, setAgreed] = useState(false);
  const isAccepted = data?.accepted ?? false;

  useEffect(() => {
    if (isInEditor || loading) return;
    if (agreed) {
      control.enable();
    } else {
      control.disable({ reason: disabledReason });
    }
  }, [agreed, control, disabledReason, isInEditor, loading]);

  const handleChange = (e: React.ChangeEvent<HTMLInputElement>) => {
    if (isInEditor) return;
    setAgreed(e.target.checked);
  };

  const isLoading = !isInEditor && loading;
  const hasError = !isInEditor && error;
  const isReady = isInEditor || (!loading && !error);

  return (
    <div className={styles.container}>
      <h2 className={styles.heading}>{heading}</h2>
      {isLoading && (
        <div className={styles.statusMessage}>
          <div className={styles.spinner} />
          Loading…
        </div>
      )}
      {hasError && (
        <div className={styles.statusMessage}>
          Error loading acceptance data. Please try again later.
        </div>
      )}
      {isReady && (
        <>
          <RichTextFieldWrapper
            tag="div"
            fieldValue={termsText}
            className={styles.terms}
          />
          <label className={styles.checkboxLabel}>
            <input
              type="checkbox"
              checked={agreed || isAccepted}
              disabled={isAccepted}
              onChange={handleChange}
            />
            I agree to the terms and conditions of this quote.
          </label>
        </>
      )}
    </div>
  );
}
```

<Note>
  The `isInEditor` prop is passed in from the parent `index.tsx`, which calls `useEditorVariableChecks()` to detect the HubSpot page editor context. The guards in `useEffect` and `handleChange` prevent the hook from firing during editor previews.
</Note>

### `useQuotePayment`

The `useQuotePayment` hook returns `{ loading, error, data, control }`.

`data` contains the following:

| Field | Type | Description |
| - | - | - |
| `paymentsEnabled` | Boolean | Whether payments are enabled for the quote. |
| `status` | String | The current payment status (`'PAID'`, `'PROCESSING'`, `'PENDING'`, or `null`). |

`control` exposes `enable()` and `disable({ reason? })`. Note that `disable()` will have no effect when `status` is `'PAID'` or `'PROCESSING'`.

## Upload the project

To upload the example project to your HubSpot account, run the following CLI command:

```shell theme={null}
hs project upload
```

For the initial upload, you'll be prompted to name and create the project. The project will then build and deploy automatically, making your module available to users.

<Warning>
  **Please note:** your project cannot be named `cpq-theme`, as this is a reserved name.
</Warning>

## Add the module to a quote

To see your module in the quote editor:

* In your HubSpot account, navigate to [Commerce > Quotes](https://app.hubspot.com/l/contacts/objects/0-14).
* In the upper right, click **Create quote**, then select **Create quote**.
* In the right panel, select a **deal** and **quote template** to use for the quote. Then, click **Create quote**.
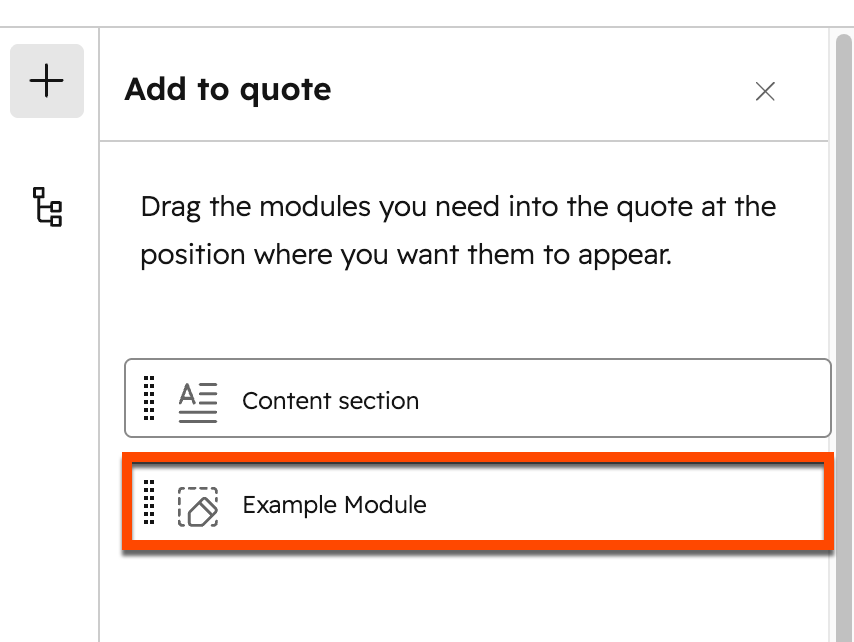
* In the left sidebar of the quote editor, click the **plus** icon.
* Drag and drop the **Example Module** into the quote.

<Frame>
  <img width="450" src="https://developers.hubspot.com/hubfs/Knowledge_Base_2023-24-25/KB-quotes/quote-editor-add-module.png" alt="Adding a quote module to a quote in the editor" />
</Frame>

The module should now appear in the quote body.
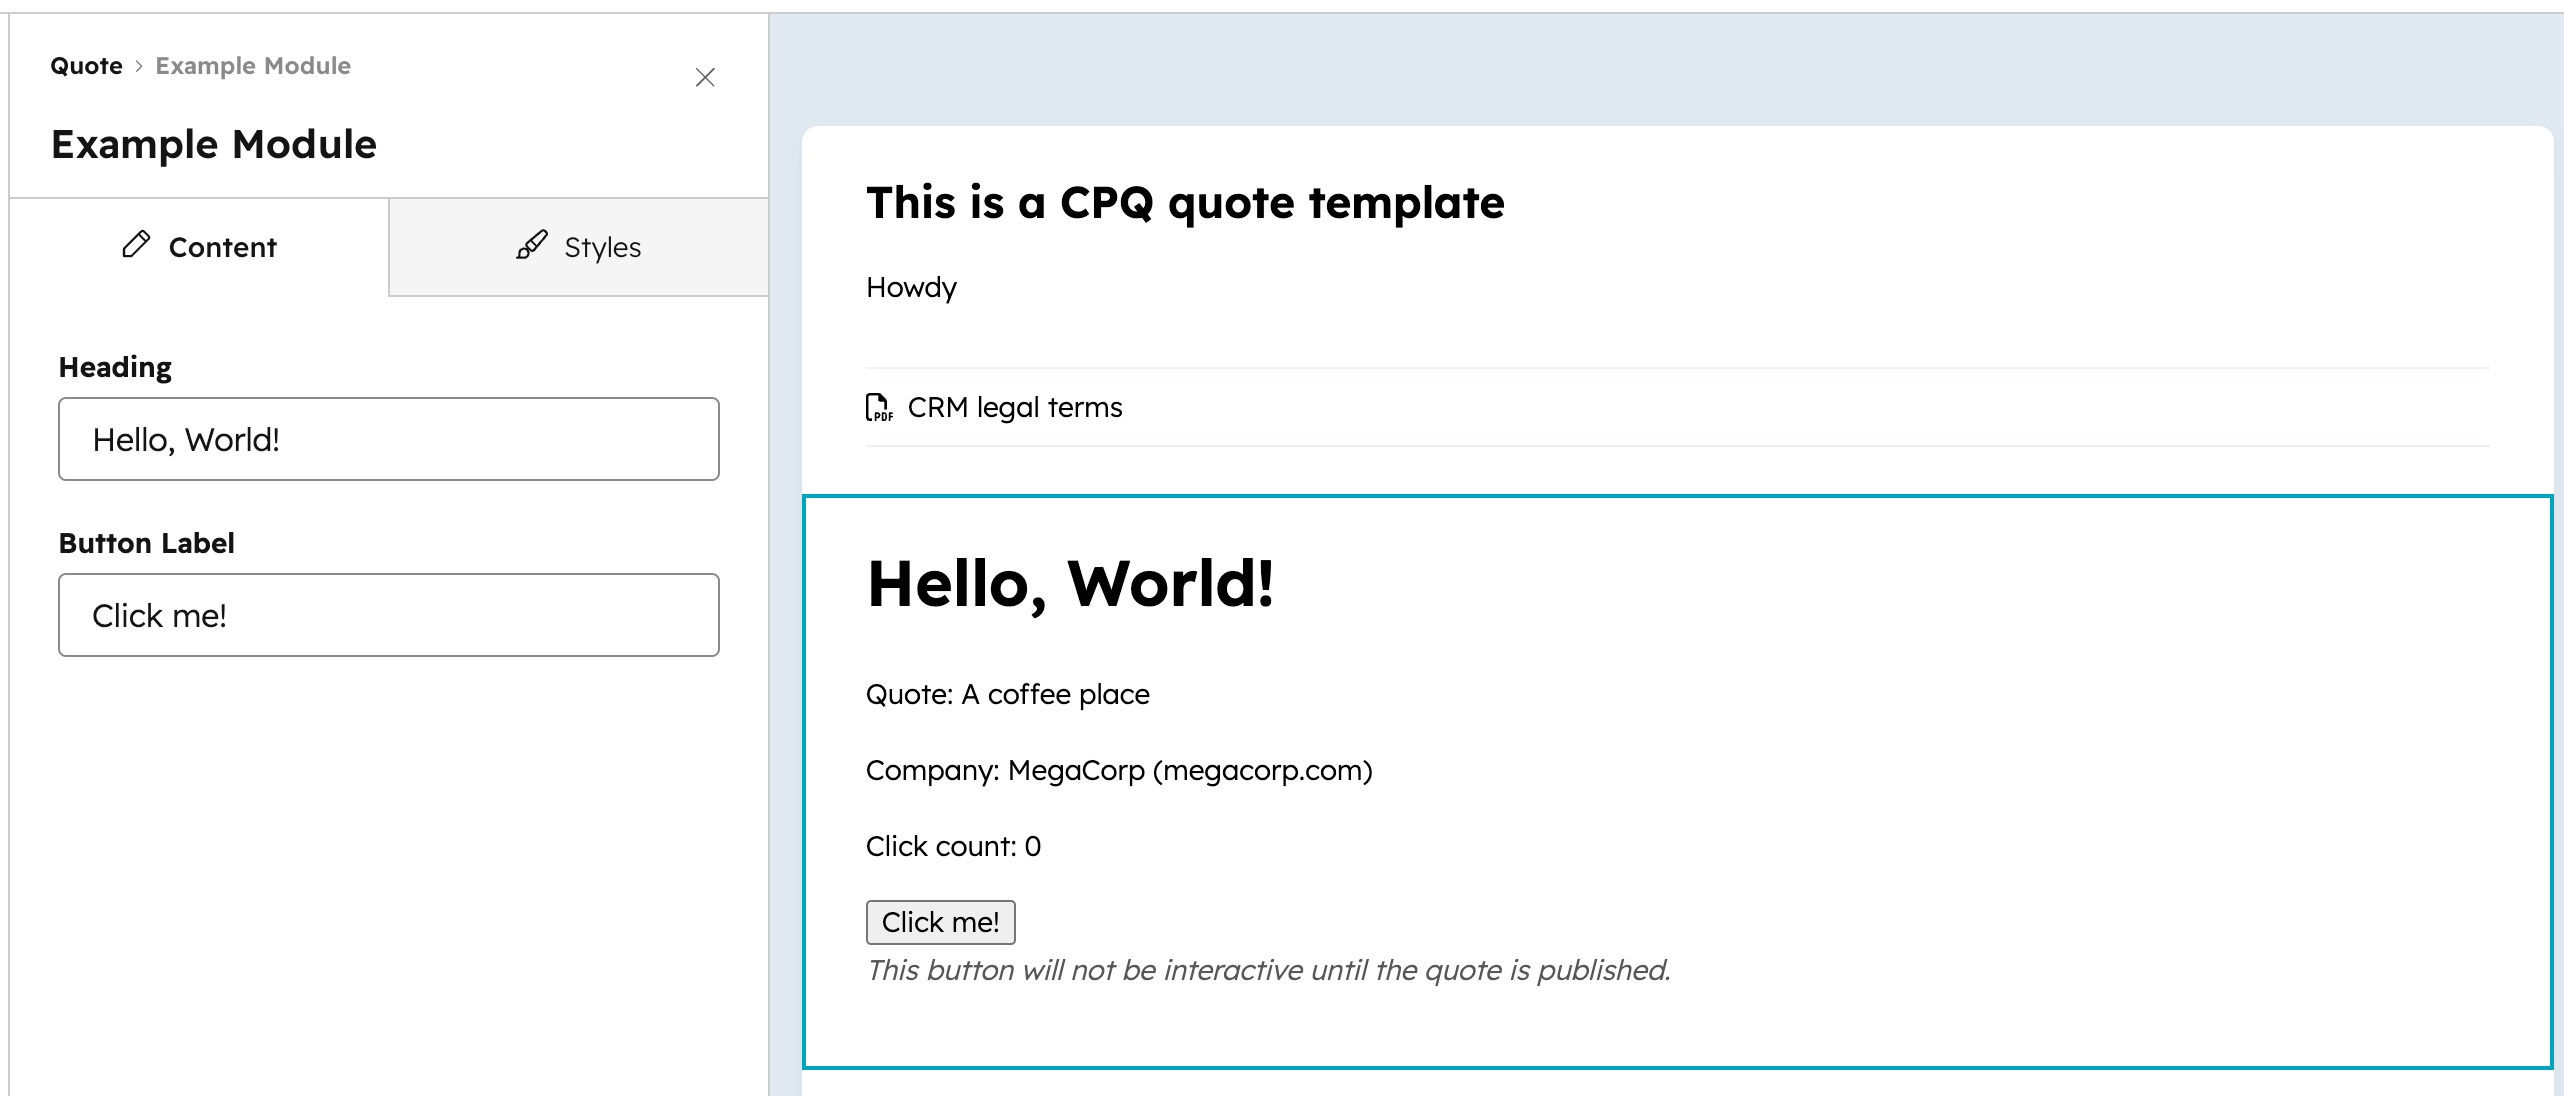
<Frame>
  <img src="https://developers.hubspot.com/hubfs/Knowledge_Base_2023-24-25/KB-quotes/quote-editor-example-module-inserted.png" alt="A custom quote module inserted into the quote body" />
</Frame>

## Published quote behavior

Quotes are rendered once at the time of publish. Keep the following in mind when updating or removing custom modules:

* If you deploy a new version of a custom module, the changes will apply to future quotes and any unpublished drafts, but not to quotes that have already been published.
* If you delete or remove a custom module from the project, it will affect unpublished quotes and templates that use it. Published quotes will not be affected. Learn more about [deleting and restoring modules](#delete-and-restore-modules).

## Delete and restore modules

### Impact of deleting a module

When you deploy a new build with a module removed from the project:

* The module is no longer available when creating new quote templates or quotes.
* Existing published quotes are unaffected until they are recalled.
* Templates or draft quotes that use the deleted module will automatically have the module removed. When a user edits one of these templates or draft quotes, an alert will be shown informing them about the deletion.

<Warning>
  **Please note:** after deleting a module, you should edit and save any templates that previously used it. This prevents users who create quotes from those templates from being prompted about the module deletion.
</Warning>

### Restore a deleted module

Once a module is deleted through a deploy, it cannot be restored by adding the module file back to your local project and re-uploading. Instead, deploy an older build that still contains the module through the projects UI in HubSpot. This makes the module available again so it can be added to new quote templates and quotes. However, templates or draft quotes that were already saved with the module removed will not have the module added back automatically — the module must be re-added to those templates or drafts manually.

1. In your HubSpot account, navigate to **Development**. Then, click the **name** of your project.
2. Click the **Builds & Deploys** tab.
3. Find the build that contains the module you want to restore, then click **Deploy**.
4. Before your next CLI upload, ensure your local project includes the original module file and any changes from newer builds so they aren't lost on the next deploy.